Are you looking for easy and effective methods to transfer photos from iCloud to your iPhone? Then, switch on your phone, go to Settings > iCloud > iCloud Photo Library > select Download > Keep Original and then wait until completing the download. Finally, get the photos on your iPhone from iCloud!
If you cannot find the pictures you’re looking for, the tutorial here has four more methods to transfer selected photos from iCloud to an iPhone. I will explain the easiest and most effective photo-sharing formulas on an iPhone from a user’s iCloud account.
So, no more words! Let’s see the methods and how to move on step by step to move images from an iCloud account to an iPhone.
Contents
- Method One: Transferring Photos from iCloud to an iPhone via iCloud Library!
- Method Two: Transferring Photos from iCloud.com to an iPhone!
- Method Three: Transferring Photos from iCloud Photo Stream to an iPhone!
- Method Four: Transferring Photos from iCloud to iPhone via an iCloud Backup Extractor!
- Frequently Asked Questions-FAQs for Transferring Photos from iCloud to iPhone!
- Concluding Comment
Method One: Transferring Photos from iCloud to an iPhone via iCloud Library!
Downloading or transferring photos from iCloud Library to an iPhone looks simpler with fewer steps. Here is how to go with the iCloud Photo Library!
- Go to the Settings of your iPhone.
- Scroll down and tap iCloud from the left navigation bar.
- Click on the iCloud Photo Library from the right popup interface.
- Select Download and Keep Original to start downloading.
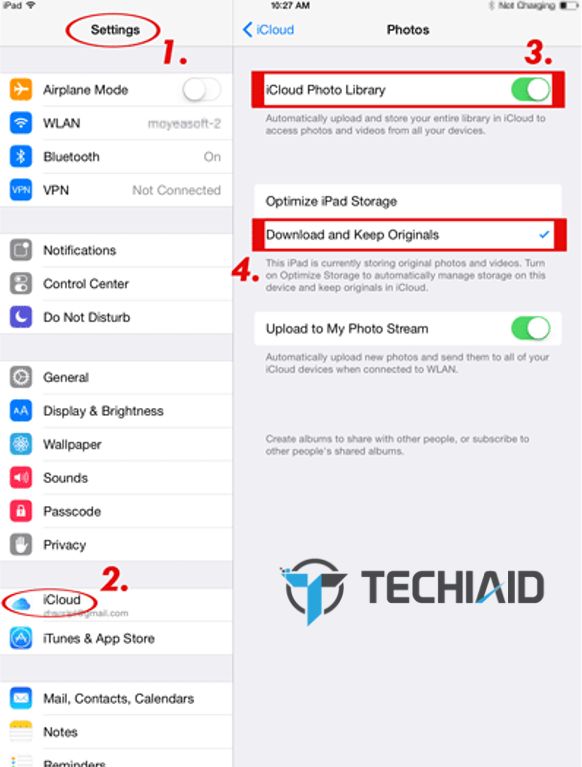
Wait until the downloading end properly. You will find the downloaded photos in your phone’s photo gallery. However, you can upload your photos again to iCloud Photo Library whenever you want.
Issues with the Method!
- Downloading takes a long time.
- You cannot select your desired photos to transfer.
- Internet connection is mandatory.
Method Two: Transferring Photos from iCloud.com to an iPhone!

If your iCloud Photos App is enabled in the same Apple Account, method two can be a perfect pick to transfer photos to your iPhone. It lets you download your photos to your iPhone from the iCloud website. Here is how to go with an iCloud Account!
- Login to iCloud.com
with your Apple ID and password.
- Tap Photos from the iCloud interface.
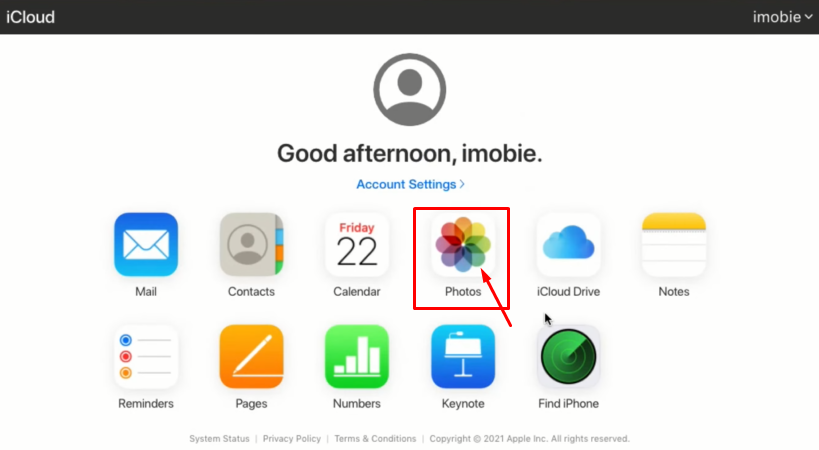
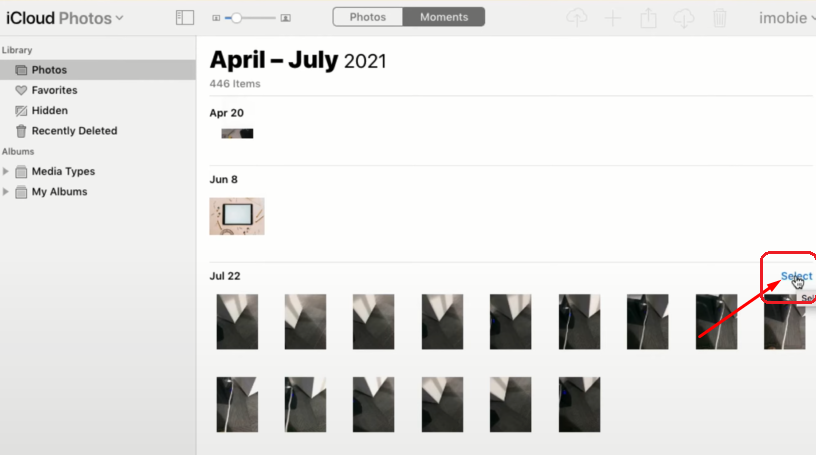
- Choose your photos to download to your iPhone.
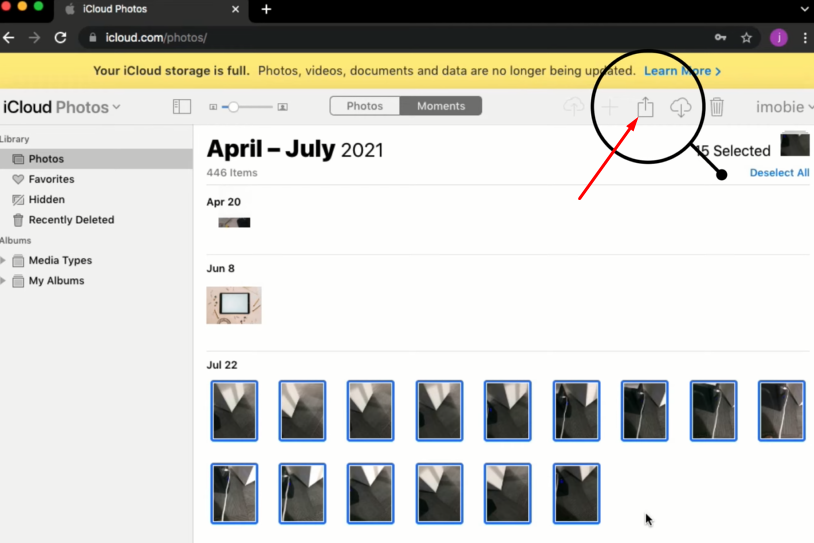
It may take a few minutes to complete the download process. The downloaded photos will be available in your iPhone’s gallery later.
Issues with the Method!
- iCloud photos must be under the same Apple ID.
- Faster internet connection.
Method Three: Transferring Photos from iCloud Photo Stream to an iPhone!
You can apply the third method to transfer photos to your iPhone stored over the last 30 days in your iCloud account. However, it wouldn’t be a good deal if you want to transfer photos for more than the timeframe. Here is how to transfer pictures with the My Photo Stream Album.
- Tap the Settings of your iPhone.
- Get down and click on the Photos icon.
- Swipe the Upload to My Photo Stream option at the right bar.
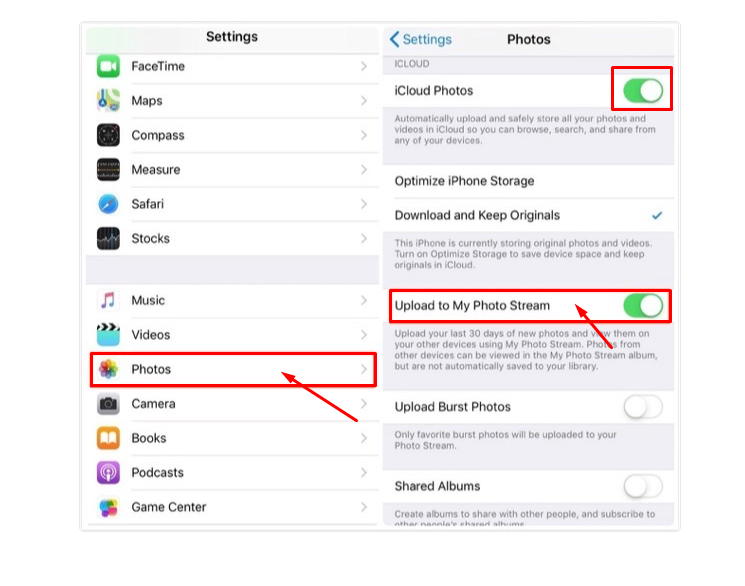
Let your device complete the download process. And finally, find your photos over the last 30 days on your iPhone’s gallery.
Issues with the Method!
- It doesn’t automatically save photos to your library.
- Applicable only for the last 30 days of new photos.
Method Four: Transferring Photos from iCloud to iPhone via an iCloud Backup Extractor!
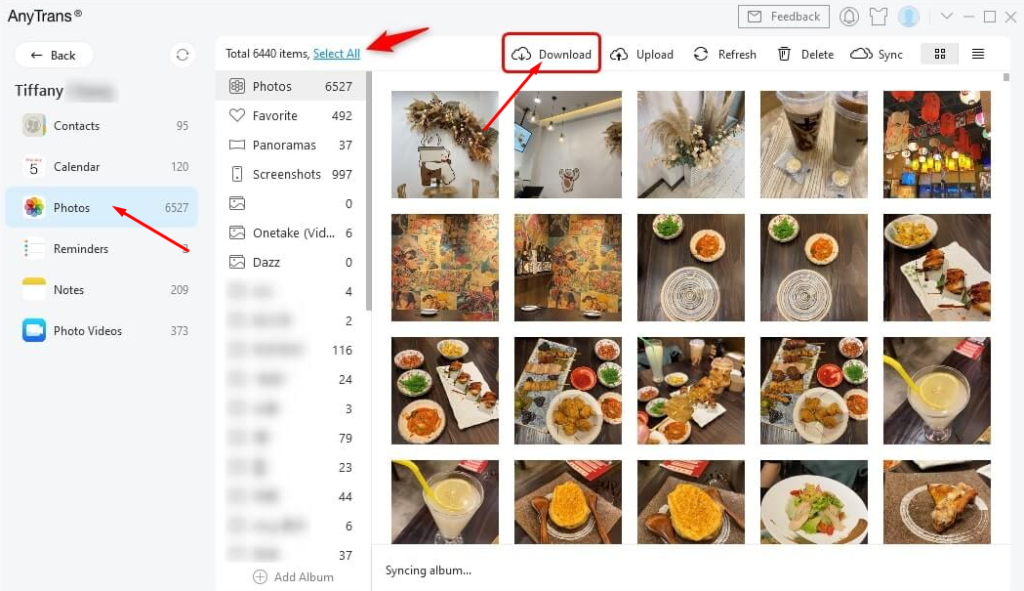
Some iCloud backup extractors can work great to download and transfer photos to iPhones. AnyTrans is such an effective extractor to make photo transferring easier than ever. If you aren’t satisfied enough, try the bonus method here with the following steps.
- Download and run AnyTrans
on your Mac or Windows PC.
- Use a USB cable to connect your iPhone to the computer.
- Tap iCloud Manager to proceed.
- Sign in to the iCloud account with your Apple ID and password.
- Choose the photo gallery on your iCloud interface.
- Tap Download at the top right corner.
- Finally, transfer the downloaded photos from your computer to an iPhone.
AnyTrans seems simple and works great to extract and share photos from iCloud to an iPhone. It doesn’t require resetting, restoring, or restarting your device to do the job.
Issues with the Method!
- It requires an AnyTrans run computer.
- Third-party system.
Frequently Asked Questions-FAQs for Transferring Photos from iCloud to iPhone!
Tons of questions can come to your mind when trying to transfer photos from your iCloud backup to an iPhone. Let’s pick the most related questions with the relevant answers here.
Can I keep my photos’ original resolution while transferring from iCloud to an iPhone?
iCloud Photos App preserves photos with their original resolution. It doesn’t harm photo resolution while transferring from an iCloud account to an iPhone or any other iOS device.
So, if you upload the full-resolution photos to your iCloud Photos, you can get them back to your iPhone with their original properties.
Does the device’s low power mode affect iCloud photo transferring?
An iPhone’s low power mode helps the device retain power for an extended period. It consumes less power and lets the battery last longer than ever. However, the battery’s low power mode affects downloading or transferring of photos and files from iCloud.
It may temporarily pause iCloud data sharing and automatic photo downloading. So, check your device’s power mode first and go for transferring iCloud photos to your iPhone later.
Concluding Comment
One iCloud account offers iOS users all data storing solutions 24/7 from anywhere. Like others, you probably prefer making iCloud backup for your all-stunning photos. And sometimes, you may need to transfer your photos to a new iPhone, save cloud storage, and more.
You must follow a proven transferring path to protect your memorable and valuable photos from loss. People love the methods described in the tutorial. You can prefer any of the methods to make a happier transfer of your photos from iCloud to an iPhone.
Don’t forget to leave your comment if you find any more issues here. Stay well.
