Before resetting your iPhone, back up your data on iCloud, then go to Settings > General > Reset and select “Erase All Content and Settings” to wipe out all the existing content and settings and sign out of all accounts linked to your iPhone.
Resetting your iPhone is a go-to solution for many common problems. However, the risk of losing all your data is a major concern with this fix, particularly if you haven’t backed up your device recently.
In this article, I’ll guide you through how you can reset your iPhone without losing data by backing it up first. You’ll also learn to restore the device to its previous stage and troubleshoot common issues with resetting and understanding the risks involved.
Contents
- First Stage: Backup Your Data
- Second Stage: Reset Your iPhone
- Final Stage: Restore Your iPhone Data
- Restore Your iPhone Data from an iTunes Backup
- Alternative Ways to Reset Your iPhone [Using Third-Party Software]
- 5 Common Problems You May Face When Resetting An iPhone [With Fixes]
- Frequently Asked Questions
- Conclusion
First Stage: Backup Your Data
Resetting your iPhone indeed solves many problems, but it also completely wipes off your data, including your contacts, messages, photos, and videos. Backing up your data, therefore, comes first so you don’t lose anything important.
Backup Your iPhone Using iCloud
iCloud is by far the best option for backing up your data. Apple gives you 5 gigs of cloud storage per Apple ID for free. However, you can purchase additional storage space of up to 2 TB with a monthly subscription fee.
To back up your iPhone data using iCloud, follow these steps:
- Connect your iPhone to a Wi-Fi network.
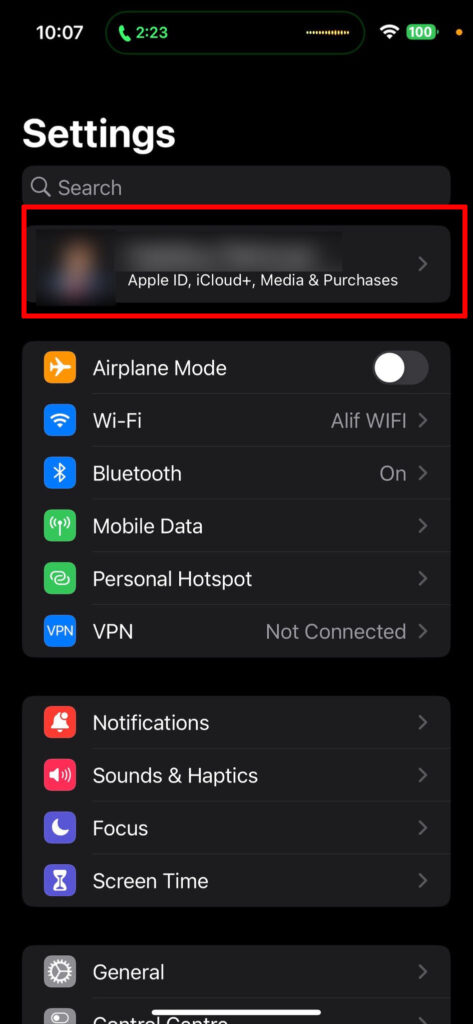
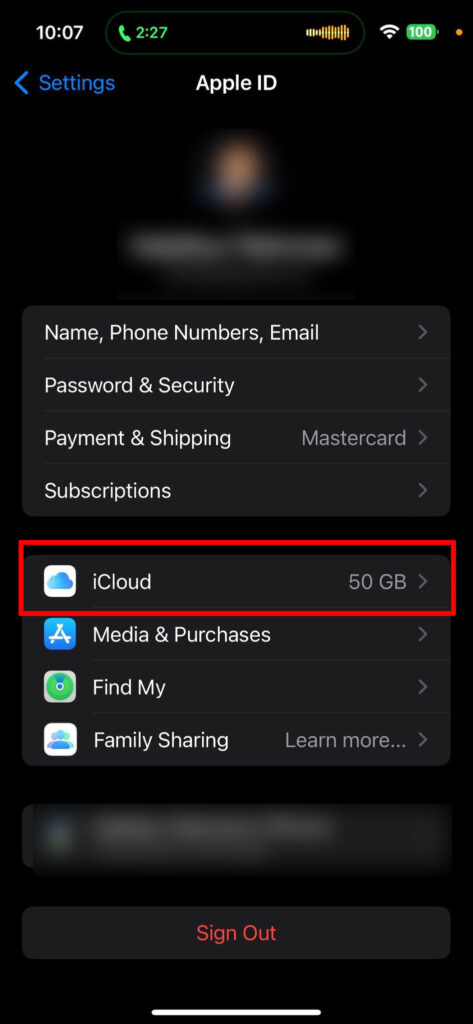
- Go to Settings > Profile > iCloud. You’ll find “Profile,” usually with your name, on the top of the settings menu.
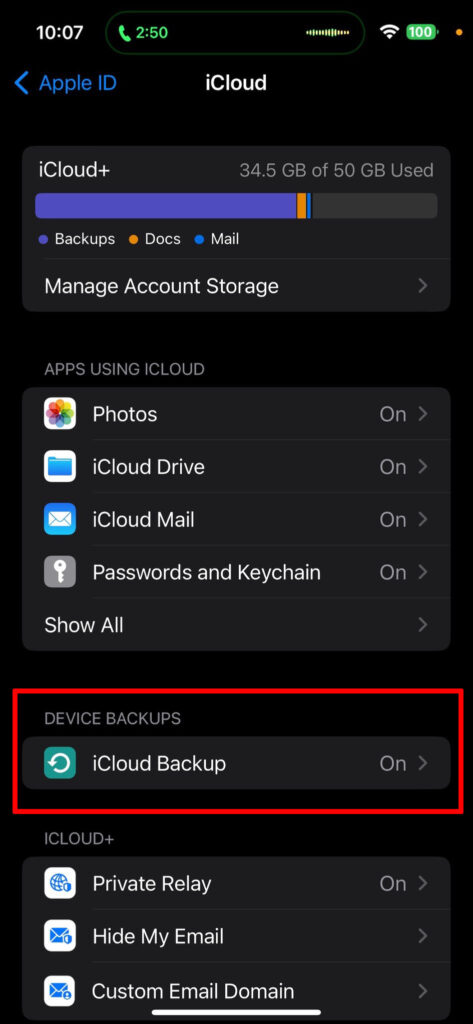
- Scroll down and select iCloud Backup.
- You’ll have to turn On the “Back Up This iPhone” toggle if this is the first time you are backing up a particular device.
- Tap Back Up Now to start the backup process.
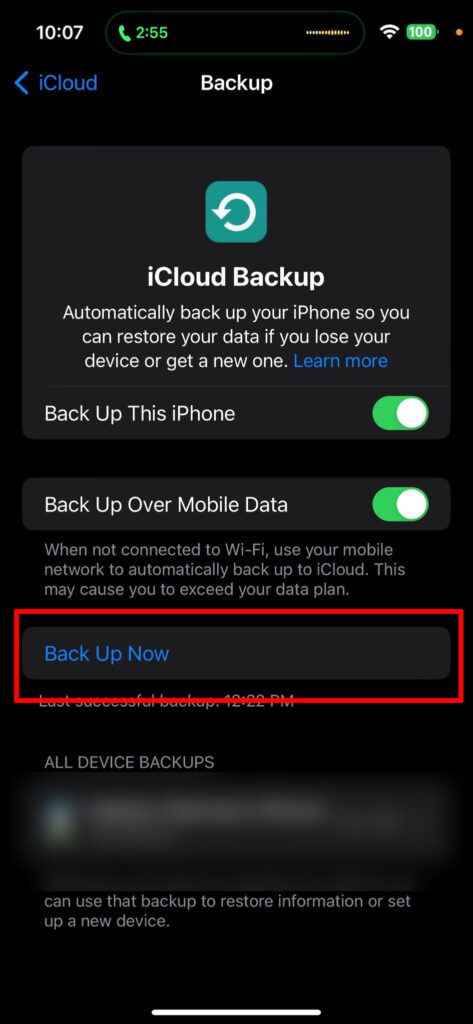
You can check the estimated time for backup at the bottom of your iPhone screen. Keep in mind that this time varies depending on what type of file you’re backing up, of what size, and at what internet speed.
Backup Your iPhone Using MacBook
Alternatively, you can use iTunes and Mac Finder to create a local backup of your iPhone data on your computer. In this case, you’ll need a lightning cable and a MacBook running macOS Catalina or later.
To back up your iPhone data using iTunes or Finder, follow these steps:
- Connect your iPhone to your Mac using a Lightning-to-USB cable.
- Open the Finder window on your PC (running macOS Catalina or later).
- Select your iPhone name from the sidebar.
- Your Mac will likely ask for permission if this is your first time connecting to the iPhone. Click Trust to continue.
- Now, enter your device passcode (on your iPhone) to confirm.
- Back to your computer screen, choose ‘Backup all of the data on your iPhone to this Mac’ from the Backups section.
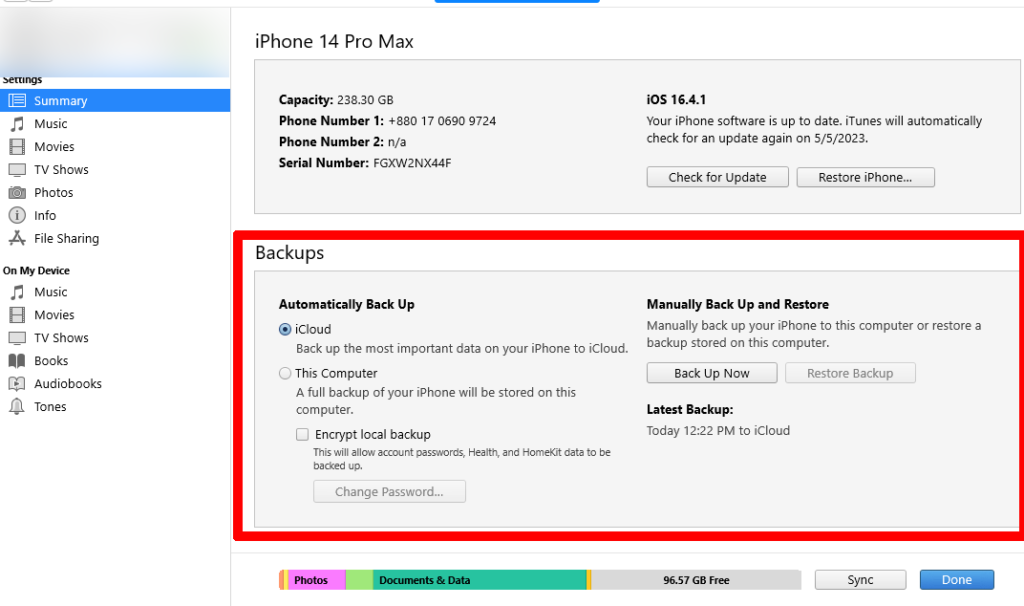
- Click Back Up Now to start the backup process.
You can also choose the Encrypt local backup option to safely store your iPhone passwords and sensitive data, such as health and activity data, HomeKit data, etc.
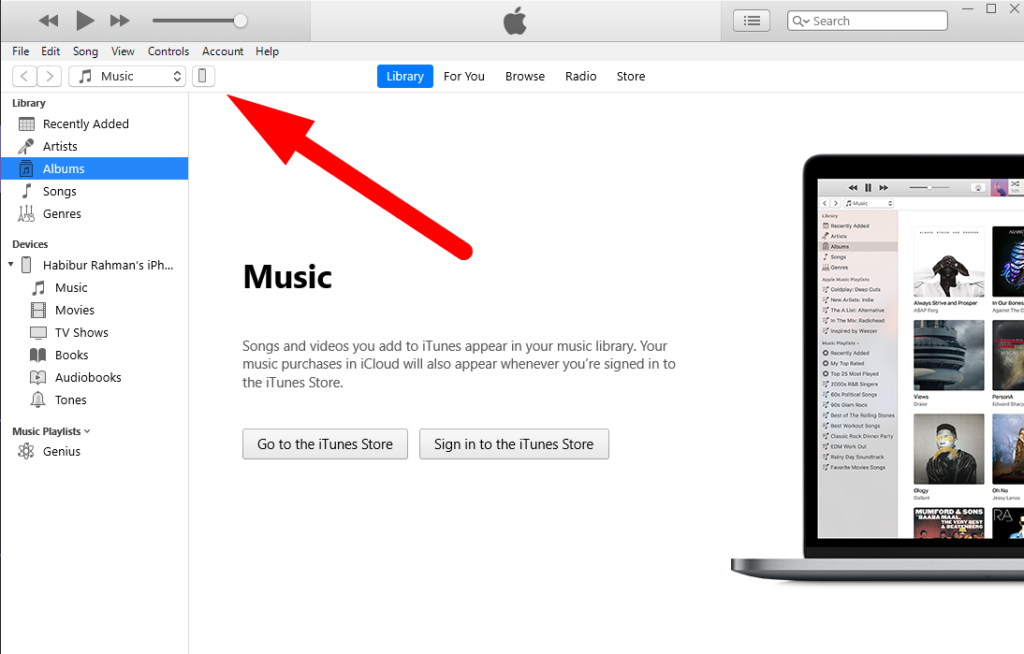
To back up your iPhone using iTunes, first, connect your iPhone to your computer, open the iTunes app, and select the device button on the top-left of your Mac screen. Select Summary under the Settings menu and click Back Up Now to start the backup process.
Bonus Tips
When backing up your data, don’t forget to try the following:
- Ensure a stable Wi-Fi network.
- Use the cable that comes with the box.
- Keep your iPhone plugged in during the backup process.
- Do not disconnect your device during the backup process.
- Make sure the backup is complete before resetting your iPhone.
- Always keep the iCloud Backup toggle turned ON, just to be safe.
Second Stage: Reset Your iPhone
Assuming you’ve successfully backed up all your data, now let’s have a look at how you can reset your device. But what type of reset do you have in mind?
As you may know, iPhones have three different types of resets. These are-
| Soft Reset | A soft reset is basically a force restart of your device. This helps fix minor glitches on your iPhone and has nothing to do with your content and settings. |
| Reset All Settings | Just as the name suggests, this option will reset all of your iPhone’s settings to their default arrangements. Likewise, it has nothing to do with your photos, videos, contact, or any other personal data. |
| Factory Reset | A factory reset will restore your iPhone to its original state, erasing all data and settings from the device. |
Throughout this article, I will focus on factory reset as this is the type of reset where you risk losing all your data.
Reset Your iPhone from the Settings Menu
To reset your iPhone without losing data, follow these steps:
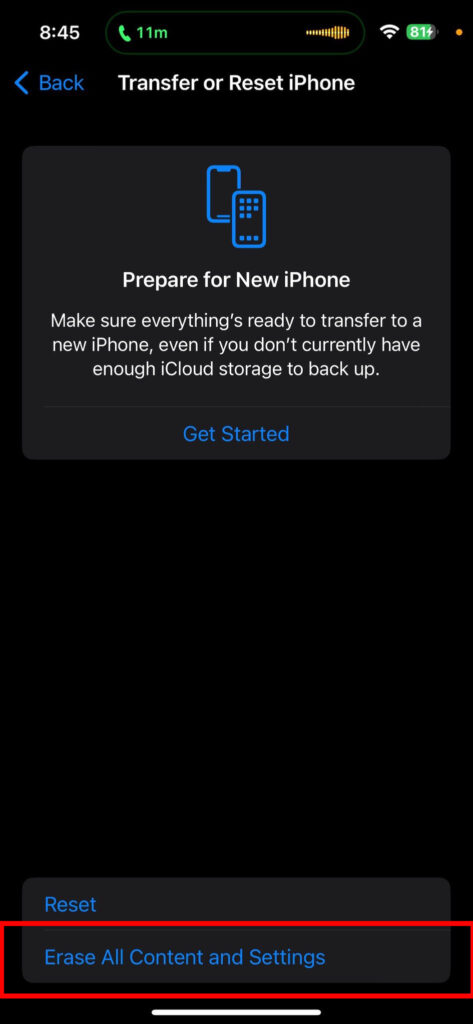
- Go to Settings > General and scroll down to select Transfer or Reset iPhone.
- Select Erase All Content and Settings and tap Continue to proceed.
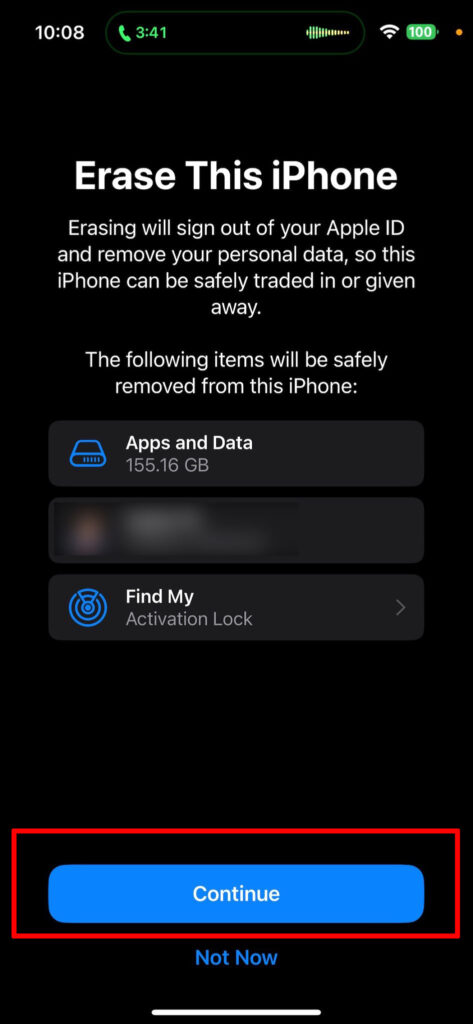
- Enter your passcode when prompted. You may also need to enter your screen time passcode in this step.

- iCloud will now automatically back up your data. Wait for a few moments for it to finish.
- Enter your Apple ID and password, then select Turn off from the top-right corner of your screen.
- To confirm the factory reset, tap Erase iPhone from the pop-up one last time.
Wait a couple of minutes till you see the hello screen. Once the process is done, you’ll be prompted to enter your Apple ID and passcode and set up the device from scratch. And that’s pretty much how you restore your iPhone to factory setup.
Reset Your iPhone Using a Computer
Many often, we get customers who bring in devices with critical issues that require significant time to repair. If the customer prefers to leave the device in our hands for the time being, we suggest a factory reset to ensure user data privacy. But how do you reset an iPhone with a broken screen?
What we do in this case is restore the device using a computer. You can do this too if you have a computer, Mac or Windows, at your disposal.
To do this, first, connect your iPhone to a MacBook using a USB cable. Then-
- Open the iTunes app on your PC.
- From the top-left corner, click on the phone icon to select your device.

- Within the Summary tab, you’ll see an option Restore iPhone. Click on it.
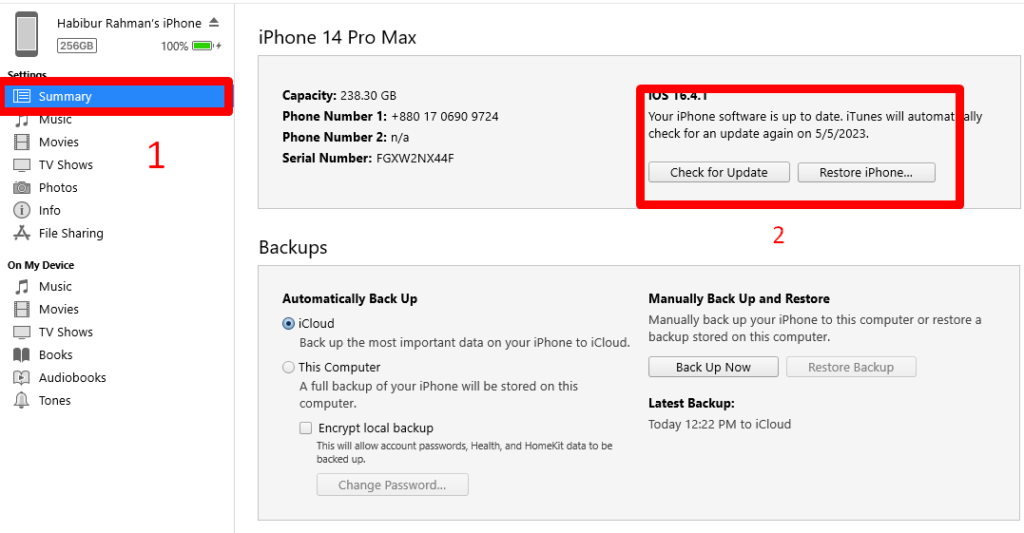
- Now, simply follow the on-screen instructions to complete the procedure.
You can download iTunes for Windows to reset your iPhone as well. The procedure will remain the same as mentioned above. Though, I’d recommend using a MacBook or third-party apps instead.
Why?
Third-party apps provide a one-click solution to various iPhone issues. From boot loop problems to simple bugs, some apps can fix them all within seconds. And with a MacBook, you get to use both iTunes and the Finder app to restore an iPhone or iPad.
Besides, you can keep a local backup if you want. Flexibility and ease of use are both guaranteed!
Final Stage: Restore Your iPhone Data
If you only want to reset your iPhone without losing data, your journey ends here. However, in many cases, users need to restore their device to its previous state after a reset, especially if it’s part of the troubleshooting process.
So, how do you take your iPhone back to the way it was?
In fact, you can restore your iPhone data in two ways- iCloud and iTunes/Finder. In the section below, I’ll talk about both.
Restore Your iPhone Data from an iCloud Backup
- Right after the reset, turn on your iPhone and follow the on-screen setup prompts. Keep in mind to connect your device to a WiFi network during the setup.
- Continue the setup process until you reach the Apps & Data screen.
- You’ll see a list of available options. Select Restore from iCloud Backup.
- Sign in with your Apple ID and password that you used to back up your data.
- Agree to the Terms and Conditions.
- If you have another iPhone under the same Apple ID, you’ll need to enter the passcode of that device in this step.
- Choose the backup you want to restore from the list of all available backups, preferably the latest one.
- Follow the prompts and wait for the restore process to complete.
Depending on the size of your backup and the speed of your Wi-Fi network, the restore process can take anywhere from a few minutes to several hours.
Restore Your iPhone Data from an iTunes Backup
- Connect your iPhone to a MacBook with a USB and follow steps 1-3 as mentioned in the iCloud restore section.
- Now, instead of iCloud, choose Restore from Mac or PC.
- Back to your computer screen, iTunes will automatically detect the prompt and ask you to choose a backup file from a list of all available backups.

- Choose the latest one to date, enter your Apple ID password, and hit return.
- The data restoration process will start right away.
Once the restore process is complete, your iPhone will restart, and your data will be restored. Just make sure to keep your MacBook and iPhone fully charged during the process and use a functional USB cable.
Alternative Ways to Reset Your iPhone [Using Third-Party Software]
You can also use free third-party tools like Fixppo for iOS, Dr.Fone, ReiBoot, and many more to reset your iPhone. These are some of the most reliable, secure, and widely compatible tools in the industry.
Third-party tools can come in handy in case your iPhone is disabled and you need to back up data before resetting or when you forget your passcode.
Here, I’ll only talk about iMyFone Fixppo, but you can use any of the tools mentioned above as the process is quite similar for all.
- Download and install iMyFone Fixppo
on your computer. It’s FREE to download!
- Launch the software and choose Reset iDevices.
- Now, select Standard Mode. If you forgot your passcode, then select Hard Reset instead.
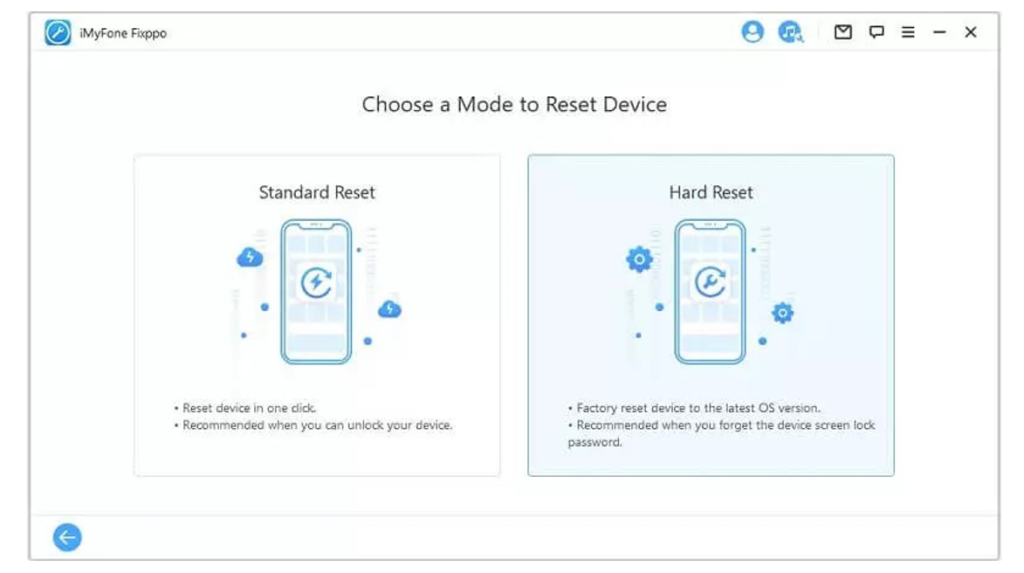
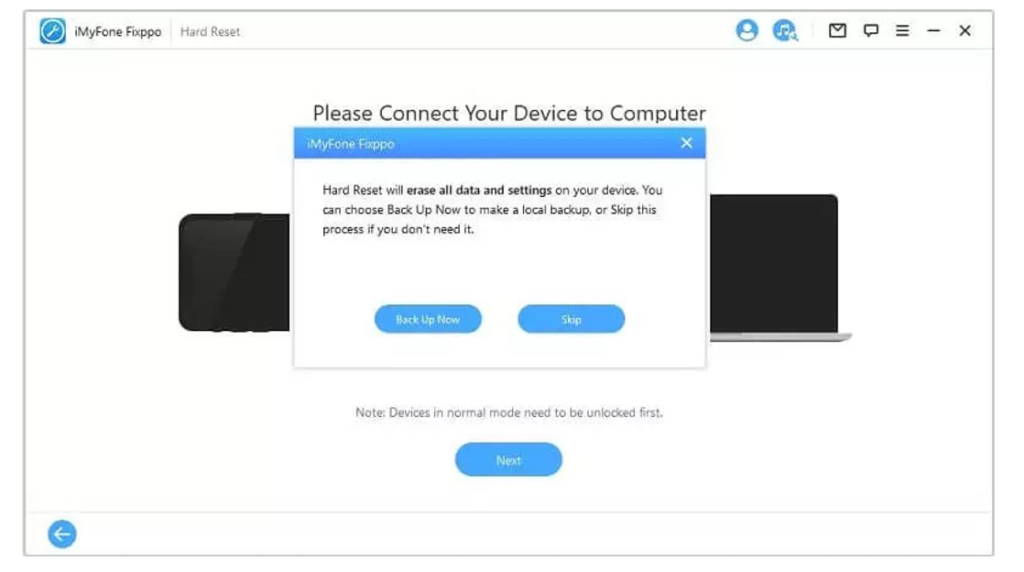
- Connect your iPhone to your computer and click Next.
- In this stage, you can either Backup your iPhone or select Skip if you already have a recent backup.
- Now, select your iPhone model and firmware version from the drop-down menu and click Download.
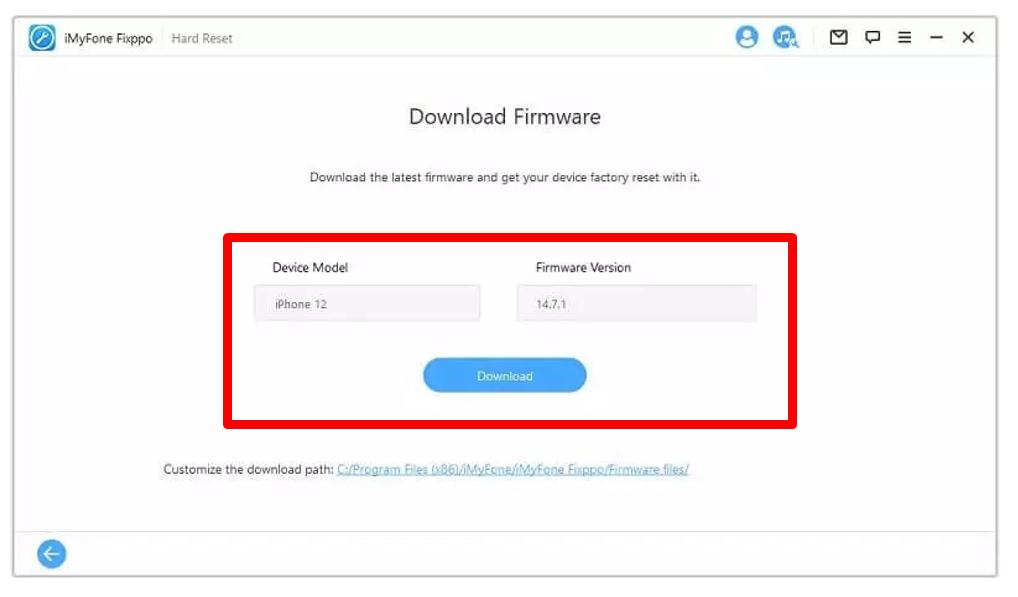
- Once the download is complete, you’ll be asked to confirm your actions. Simply click on the Hard Reset/Start button to continue.
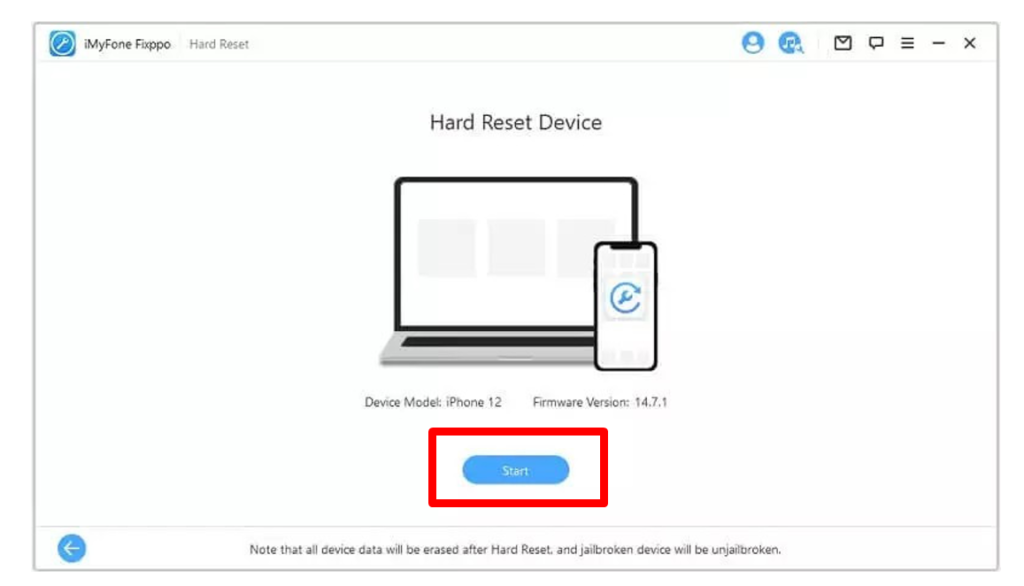
- Follow the on-screen instructions to put your iPhone into DFU (Device Firmware Update) mode. The process varies depending on your iPhone model, so be cautious when following the prompts.
And it’s Done! This process can take several minutes, depending on the size of the iOS firmware and your internet speed. Surprisingly, you can even recover permanently deleted photos with these tools. Now that’s something iTunes can’t do so easily!
5 Common Problems You May Face When Resetting An iPhone [With Fixes]
Losing all your data is only one of the risks you may encounter. Keeping a backup can help, but what if you face more complex issues? What are the risks of resetting your iPhone and how do you fix or prevent it?
There’s a slim chance you’ll ever come across these problems, but it never hurts to be in the know. Here are a few of the risks you may encounter when resetting your iPhone, and ways to prevent them.
| Issue | Quick Fixes |
| Data Loss During Reset | – Backup data before resetting – Use iCloud or iTunes for backup – Enable automatic backups |
| Activation Lock | – Sign out of iCloud before resetting – Remove the device from Apple ID account – Contact Apple Support if locked out |
| Stuck on Apple Logo/Boot Loop | – Perform a hard reset – Use Recovery Mode and update via iTunes – DFU mode and restore with iTunes or third-party apps |
| Software Update Failure | – Ensure stable Wi-Fi connection – Delete and re-download the update – Update via iTunes or Finder |
| Missing Apps or Features After Reset | – Check for iOS updates – Reinstall missing apps from the App Store – Restore the iPhone from a backup |
Frequently Asked Questions
Can I Reset My iPhone Without a Computer?
Yes, you can reset your iPhone without a computer. Simply open your iPhone and go to Settings > General > Reset and tap Erase All Content and Settings. And don’t forget to back up your data first!
Will Resetting My iPhone Delete My Photos?
Yes, resetting your iPhone will delete your photos. However, the photos will be restored if you have recently backed up your data and use the same Apple ID to log back in.
How Long Does It Take to Reset an iPhone?
This is quite hard to determine. But if you properly follow the steps, typically it takes 5-10 minutes per many iPhone users. But, depending on the backup data size, it may take more than an hour.
Can I Cancel a Reset Once It Has Started?
No, you cannot cancel a reset once it has started. Interrupting the process may cause your iPhone to malfunction and fall into a boot loop.
Is It Safe to Sell My iPhone After Resetting It?
Yes, you can sell your iPhone after resetting it. Resetting your iPhone will erase all of your personal information, including multimedia, payment gateways, subscriptions, and more.
Besides, device settings, installed apps, and customizations will also be restored back to its original state. However, don’t forget to sign out of your iCloud account and disable Find My features to avoid activation lock issues for the new owner.
What to Do if Your iPhone Is Stuck in Recovery Mode?
If your iPhone is stuck in recovery mode after resetting it, first, try to restore your iPhone from iTunes. If that fails, put your iPhone in DFU mode and try to restore it again.
If you’re still having issues, contact Apple Support for further assistance.
Conclusion
So the process goes like this- backup your data, reset your iPhone, and restore it back to normal with the previous backup if required. Pretty simple, right?
Understanding the different types of resets and the importance of keeping a backup can make all the difference while resetting. And if you follow the steps outlined in this article, as well as the troubleshooting guide, you can reset your iPhone without losing any data within minutes.
Leave a comment if you have further questions or check out our other blog posts. We’ve quite a few on iPhone reset.
